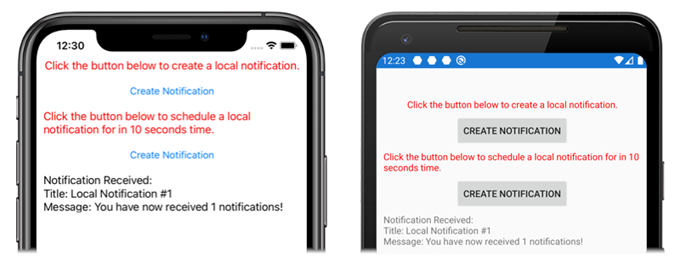
Локальные уведомления в Xamarin – это предупреждения, отправляемые приложениями, установленными на мобильном устройстве. Локальные уведомления часто используются для таких функций, как:
- события календаря;
- напоминания;
- триггеры на основе местоположения.
Каждая платформа по-разному обрабатывает создание, отображение и потребление локальных уведомлений. В этой статье объясняется, как создать кроссплатформенную абстракцию для отправки, планирования и получения локальных уведомлений в Xamarin.Forms.

Создание кроссплатформенного интерфейса
Приложение Xamarin.Forms должно создавать и использовать уведомления, не обращая внимания на реализацию базовой платформы. Следующий интерфейс INotificationManager реализован в библиотеке общего кода и определяет кроссплатформенный API, который может использовать приложением для взаимодействия с уведомлениями:
public interface INotificationManager
{
   event EventHandler NotificationReceived;
   void Initialize();
   void SendNotification(string title, string message, DateTime? notifyTime = null);
   void ReceiveNotification(string title, string message);
}
Этот интерфейс будет реализован в каждом проекте платформы. Событие NotificationReceived позволяет приложению обрабатывать входящие уведомления. Метод Initialize должен выполнять любую встроенную логику платформы, необходимую для подготовки системы уведомлений. Метод SendNotification должен отправить уведомление в необязательное время DateTime. Метод ReceiveNotification должен вызываться базовой платформой при получении сообщения.
Использование интерфейса в Xamarin.Forms
После создания интерфейса его можно использовать в общем проекте Xamarin.Forms, даже если реализация платформы еще не создана. Пример приложения содержит страницу ContentPage под названием MainPage.xaml со следующим содержимым:
<StackLayout Margin="0,35,0,0"
            x:Name="stackLayout">
   <Label Text="Click the button below to create a local notification."
          TextColor="Red"
          HorizontalOptions="Center"
          VerticalOptions="Start" />
   <Button Text="Create Notification"
           HorizontalOptions="Center"
           VerticalOptions="Start"
           Clicked="OnSendClick" />
   <Label Text="Click the button below to schedule a local notification for in 10 seconds time."
          TextColor="Red"
          HorizontalOptions="Center"
          VerticalOptions="Start" />
   <Button Text="Create Notification"
           HorizontalOptions="Center"
           VerticalOptions="Start"
           Clicked="OnScheduleClick" />
</StackLayout>
Макет содержит элементы Label, которые объясняют инструкции, и элементы Button, которые отправляют или планируют уведомление при нажатии.
Код-behind класса MainPage управляет отправкой и получением уведомлений:
public partial class MainPage : ContentPage
{
   INotificationManager notificationManager;
   int notificationNumber = 0;

   public MainPage()
   {
       InitializeComponent();

       notificationManager = DependencyService.Get();
       notificationManager.NotificationReceived += (sender, eventArgs) =>
       {
           var evtData = (NotificationEventArgs)eventArgs;
           ShowNotification(evtData.Title, evtData.Message);
       };
   }

   void OnSendClick(object sender, EventArgs e)
   {
       notificationNumber++;
       string title = $"Local Notification #{notificationNumber}";
       string message = $"You have now received {notificationNumber} notifications!";
       notificationManager.SendNotification(title, message);
   }

   void OnScheduleClick(object sender, EventArgs e)
   {
       notificationNumber++;
       string title = $"Local Notification #{notificationNumber}";
       string message = $"You have now received {notificationNumber} notifications!";
       notificationManager.SendNotification(title, message, DateTime.Now.AddSeconds(10));
   }

   void ShowNotification(string title, string message)
   {
       Device.BeginInvokeOnMainThread(() =>
       {
           var msg = new Label()
           {
               Text = $"Notification Received:\nTitle: {title}\nMessage: {message}"
           };
           stackLayout.Children.Add(msg);
       });
   }
}
Конструктор класса MainPage использует Xamarin.Forms DependencyService для получения специфического для платформы экземпляра INotificationManager. Методы OnSendClick и OnScheduleClicked используют экземпляр INotificationManager для отправки и планирования новых уведомлений. Метод ShowNotification вызывается из обработчика события, присоединенного к событию NotificationReceived, и вставляет новую метку на страницу при вызове этого события.
Обработчик события NotificationReceived приводит свои аргументы события к NotificationEventArgs. Этот тип определен в общем проекте Xamarin.Forms:
public class NotificationEventArgs : EventArgs
{
   public string Title { get; set; }
   public string Message { get; set; }
}
Создание реализации интерфейса Android
Чтобы приложение Xamarin.Forms могло отправлять и получать уведомления на Android, приложение должно предоставить реализацию интерфейса INotificationManager.
Создание класса AndroidNotificationManager
Класс AndroidNotificationManager реализует интерфейс INotificationManager:
using System;
using Android.App;
using Android.Content;
using Android.Graphics;
using Android.OS;
using AndroidX.Core.App;
using Xamarin.Forms;
using AndroidApp = Android.App.Application;

[assembly: Dependency(typeof(LocalNotifications.Droid.AndroidNotificationManager))]
namespace LocalNotifications.Droid
{
   public class AndroidNotificationManager : INotificationManager
   {
       const string channelId = "default";
       const string channelName = "Default";
       const string channelDescription = "The default channel for notifications.";

       public const string TitleKey = "title";
       public const string MessageKey = "message";

       bool channelInitialized = false;
       int messageId = 0;
       int pendingIntentId = 0;

       NotificationManager manager;

       public event EventHandler NotificationReceived;

       public static AndroidNotificationManager Instance { get; private set; }

       public AndroidNotificationManager() => Initialize();

       public void Initialize()
       {
           if (Instance == null)
           {
               CreateNotificationChannel();
               Instance = this;
           }
       }

       public void SendNotification(string title, string message, DateTime? notifyTime = null)
       {
           if (!channelInitialized)
           {
               CreateNotificationChannel();
           }

           if (notifyTime != null)
           {
               Intent intent = new Intent(AndroidApp.Context, typeof(AlarmHandler));
               intent.PutExtra(TitleKey, title);
               intent.PutExtra(MessageKey, message);

               PendingIntent pendingIntent = PendingIntent.GetBroadcast(AndroidApp.Context, pendingIntentId++, intent, PendingIntentFlags.CancelCurrent);
               long triggerTime = GetNotifyTime(notifyTime.Value);
               AlarmManager alarmManager = AndroidApp.Context.GetSystemService(Context.AlarmService) as AlarmManager;
               alarmManager.Set(AlarmType.RtcWakeup, triggerTime, pendingIntent);
           }
           else
           {
               Show(title, message);
           }
       }

       public void ReceiveNotification(string title, string message)
       {
           var args = new NotificationEventArgs()
           {
               Title = title,
               Message = message,
           };
           NotificationReceived?.Invoke(null, args);
       }

       public void Show(string title, string message)
       {
           Intent intent = new Intent(AndroidApp.Context, typeof(MainActivity));
           intent.PutExtra(TitleKey, title);
           intent.PutExtra(MessageKey, message);

           PendingIntent pendingIntent = PendingIntent.GetActivity(AndroidApp.Context, pendingIntentId++, intent, PendingIntentFlags.UpdateCurrent);

           NotificationCompat.Builder builder = new NotificationCompat.Builder(AndroidApp.Context, channelId)
               .SetContentIntent(pendingIntent)
               .SetContentTitle(title)
               .SetContentText(message)
               .SetLargeIcon(BitmapFactory.DecodeResource(AndroidApp.Context.Resources, Resource.Drawable.xamagonBlue))
               .SetSmallIcon(Resource.Drawable.xamagonBlue)
               .SetDefaults((int)NotificationDefaults.Sound | (int)NotificationDefaults.Vibrate);

           Notification notification = builder.Build();
           manager.Notify(messageId++, notification);
       }

       void CreateNotificationChannel()
       {
           manager = (NotificationManager)AndroidApp.Context.GetSystemService(AndroidApp.NotificationService);

           if (Build.VERSION.SdkInt >= BuildVersionCodes.O)
           {
               var channelNameJava = new Java.Lang.String(channelName);
               var channel = new NotificationChannel(channelId, channelNameJava, NotificationImportance.Default)
               {
                   Description = channelDescription
               };
               manager.CreateNotificationChannel(channel);
           }

           channelInitialized = true;
       }

       long GetNotifyTime(DateTime notifyTime)
       {
           DateTime utcTime = TimeZoneInfo.ConvertTimeToUtc(notifyTime);
           double epochDiff = (new DateTime(1970, 1, 1) - DateTime.MinValue).TotalSeconds;
           long utcAlarmTime = utcTime.AddSeconds(-epochDiff).Ticks / 10000;
           return utcAlarmTime; // milliseconds
       }
   }
}
Атрибут assembly над пространством имен регистрирует реализацию интерфейса INotificationManager в DependencyService.
Android позволяет приложениям определять несколько каналов для уведомлений. Метод Initialize создает базовый канал, который приложение-пример использует для отправки уведомлений. Метод SendNotification определяет специфическую для платформы логику, необходимую для создания и отправки уведомления. Метод ReceiveNotification вызывается ОС Android при получении сообщения и вызывает обработчик события.
Метод SendNotification создает локальное уведомление немедленно или в точное время даты. Уведомление может быть запланировано на точное время с помощью класса AlarmManager, и оно будет получено объектом, производным от класса BroadcastReceiver:
[BroadcastReceiver(Enabled = true, Label = "Local Notifications Broadcast Receiver")]
public class AlarmHandler : BroadcastReceiver
{
   public override void OnReceive(Context context, Intent intent)
   {
       if (intent?.Extras != null)
       {
           string title = intent.GetStringExtra(AndroidNotificationManager.TitleKey);
           string message = intent.GetStringExtra(AndroidNotificationManager.MessageKey);

           AndroidNotificationManager manager = AndroidNotificationManager.Instance ?? new AndroidNotificationManager();
           manager.Show(title, message);
       }
   }
}
Важно. По умолчанию уведомления, запланированные с помощью класса AlarmManager, сбрасываются при перезагрузке устройства. Однако вы можете разработать свое приложение для автоматического повторного планирования уведомлений при перезагрузке устройства.
Обработка входящих уведомлений на Android
Класс MainActivity должен обнаруживать входящие уведомления и уведомлять экземпляр AndroidNotificationManager. Атрибут Activity класса MainActivity должен указывать значение LaunchMode, равное LaunchMode.SingleTop:
[Activity(
       //...
       LaunchMode = LaunchMode.SingleTop]
   public class MainActivity : global::Xamarin.Forms.Platform.Android.FormsAppCompatActivity
   {
       // ...
   }
Режим SingleTop предотвращает запуск нескольких экземпляров активности, пока приложение находится на переднем плане. Этот режим LaunchMode может не подойти для приложений, запускающих несколько активностей в более сложных сценариях уведомлений.
В классе MainActivity модифицирован класс для получения входящих уведомлений:
protected override void OnCreate(Bundle savedInstanceState)
{
   // ...

   global::Xamarin.Forms.Forms.Init(this, savedInstanceState);
   LoadApplication(new App());
   CreateNotificationFromIntent(Intent);
}

protected override void OnNewIntent(Intent intent)
{
   CreateNotificationFromIntent(intent);
}

void CreateNotificationFromIntent(Intent intent)
{
   if (intent?.Extras != null)
   {
       string title = intent.GetStringExtra(AndroidNotificationManager.TitleKey);
       string message = intent.GetStringExtra(AndroidNotificationManager.MessageKey);
       DependencyService.Get().ReceiveNotification(title, message);
   }
}
Метод CreateNotificationFromIntent извлекает данные уведомления из аргумента намерения intent и предоставляет их AndroidNotificationManager с помощью метода ReceiveNotification. Метод CreateNotificationFromIntent вызывается как из метода OnCreate, так и из метода OnNewIntent:
- Когда приложение запускается с помощью данных уведомления, данные
intentбудут переданы в метод OnCreate. - Если приложение уже находится на переднем плане, данные Intent будут переданы в метод OnNewIntent.
Android предлагает множество дополнительных опций для уведомлений
Создание реализации интерфейса iOS
Чтобы приложение Xamarin.Forms могло отправлять и получать уведомления на iOS, приложение должно предоставить реализацию INotificationManager.
Создайте класс iOSNotificationManager
Класс iOSNotificationManager реализует интерфейс INotificationManager:
using System;
using Foundation;
using UserNotifications;
using Xamarin.Forms;

[assembly: Dependency(typeof(LocalNotifications.iOS.iOSNotificationManager))]
namespace LocalNotifications.iOS
{
   public class iOSNotificationManager : INotificationManager
   {
       int messageId = 0;
       bool hasNotificationsPermission;
       public event EventHandler NotificationReceived;

       public void Initialize()
       {
           // request the permission to use local notifications
           UNUserNotificationCenter.Current.RequestAuthorization(UNAuthorizationOptions.Alert, (approved, err) =>
           {
               hasNotificationsPermission = approved;
           });
       }

       public void SendNotification(string title, string message, DateTime? notifyTime = null)
       {
           // EARLY OUT: app doesn't have permissions
           if (!hasNotificationsPermission)
           {
               return;
           }

           messageId++;

           var content = new UNMutableNotificationContent()
           {
               Title = title,
               Subtitle = "",
               Body = message,
               Badge = 1
           };

           UNNotificationTrigger trigger;
           if (notifyTime != null)
           {
               // Create a calendar-based trigger.
               trigger = UNCalendarNotificationTrigger.CreateTrigger(GetNSDateComponents(notifyTime.Value), false);
           }
           else
           {
               // Create a time-based trigger, interval is in seconds and must be greater than 0.
               trigger = UNTimeIntervalNotificationTrigger.CreateTrigger(0.25, false);
           }

           var request = UNNotificationRequest.FromIdentifier(messageId.ToString(), content, trigger);
           UNUserNotificationCenter.Current.AddNotificationRequest(request, (err) =>
           {
               if (err != null)
               {
                   throw new Exception($"Failed to schedule notification: {err}");
               }
           });
       }

       public void ReceiveNotification(string title, string message)
       {
           var args = new NotificationEventArgs()
           {
               Title = title,
               Message = message
           };
           NotificationReceived?.Invoke(null, args);
       }

       NSDateComponents GetNSDateComponents(DateTime dateTime)
       {
           return new NSDateComponents
           {
               Month = dateTime.Month,
               Day = dateTime.Day,
               Year = dateTime.Year,
               Hour = dateTime.Hour,
               Minute = dateTime.Minute,
               Second = dateTime.Second
           };
       }
   }
}
Атрибут assembly над пространством имен регистрирует реализацию интерфейса INotificationManager в DependencyService.
На iOS перед попыткой запланировать уведомление необходимо запросить разрешение на использование уведомлений. Метод Initialize запрашивает разрешение на использование локальных уведомлений. Метод SendNotification определяет логику, необходимую для создания и отправки уведомления. Метод ReceiveNotification будет вызван iOS при получении сообщения и вызовет обработчик события.
Примечание. Метод SendNotification создает локальное уведомление немедленно, используя объект UNTimeIntervalNotificationTrigger, или в точное время DateTime, используя объект UNCalendarNotificationTrigger.
Обработка входящих уведомлений на iOS
На iOS для обработки входящих сообщений необходимо создать делегат, подкласс UNUserNotificationCenterDelegate. В примере приложения определен класс iOSNotificationReceiver:
public class iOSNotificationReceiver : UNUserNotificationCenterDelegate
{
   public override void WillPresentNotification(UNUserNotificationCenter center, UNNotification notification, Action completionHandler)
   {
       ProcessNotification(notification);
       completionHandler(UNNotificationPresentationOptions.Alert);
   }

   void ProcessNotification(UNNotification notification)
   {
       string title = notification.Request.Content.Title;
       string message = notification.Request.Content.Body;

       DependencyService.Get().ReceiveNotification(title, message);
   }
}
Этот класс использует DependencyService для получения экземпляра класса iOSNotificationManager и предоставляет данные входящих уведомлений методу ReceiveNotification.
Класс AppDelegate должен указать объект iOSNotificationReceiver в качестве делегата UNUserNotificationCenter во время запуска приложения. Это происходит в методе FinishedLaunching:
public override bool FinishedLaunching(UIApplication app, NSDictionary options)
{
   global::Xamarin.Forms.Forms.Init();

   UNUserNotificationCenter.Current.Delegate = new iOSNotificationReceiver();

   LoadApplication(new App());
   return base.FinishedLaunching(app, options);
}
Тестирование приложения
После того как проекты платформы содержат зарегистрированную реализацию интерфейса INotificationManager, приложение можно протестировать на обеих платформах. Запустите приложение и нажмите любую из кнопок Create Notification, чтобы создать уведомление.
На Android уведомления появятся в области уведомлений. При нажатии на уведомление приложение получает уведомление и выводит сообщение:

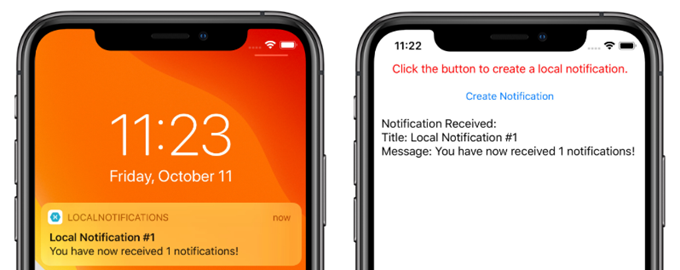
На iOS входящие уведомления автоматически принимаются приложением, не требуя ввода данных пользователем. Приложение получает уведомление и выводит сообщение:

